XWall - The Mail Filter Built for Microsoft Exchange
Works with:
Spam Detection using:
Administer using:
Optionally blocks messages:
Security:
Reporting:
Optional Features:
| How XWall works |
| For incoming messages, XWall needs to get the message before your Exchange server will get it so that it can perform it checks before passing the message over to Exchange. Depending on whether you run XWall on the same machine as Exchange or on a different machine, XWall either needs to hook up to port 25 or to act as a relay host (respectively). For outgoing messages, Exchange server passes the message to XWall, which performs its checks and then sends the message out in the Internet. From Exchange Servers viewpoint, XWall is a normal relay host. So the message flow for incoming messages would be Internet -> XWall -> Exchange server and for outgoing messages it would be Exchange server -> XWall -> Internet |
| System Requirements |
| Windows 2003-2022 Linux with WINE Microsoft Exchange, Lotus Notes or any other SMTP server |
| Installation |
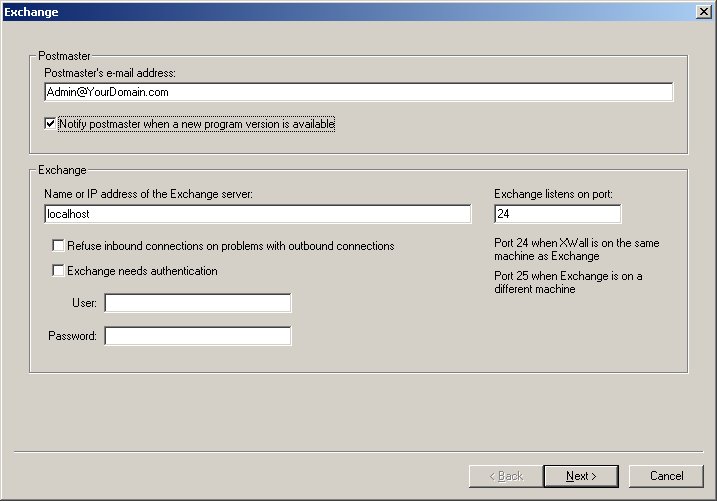
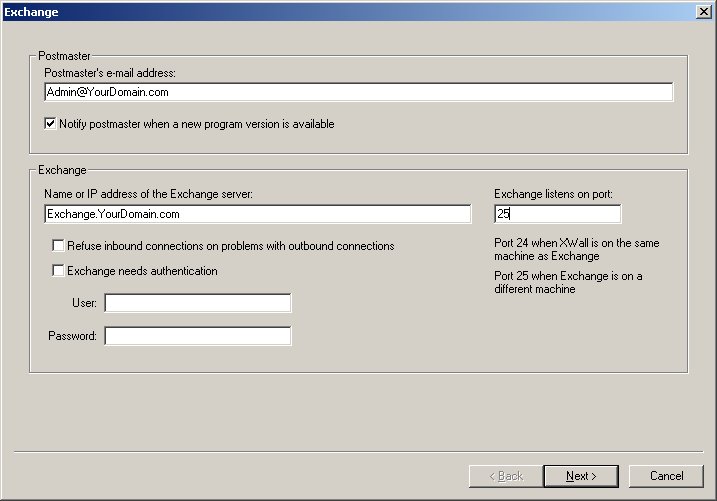
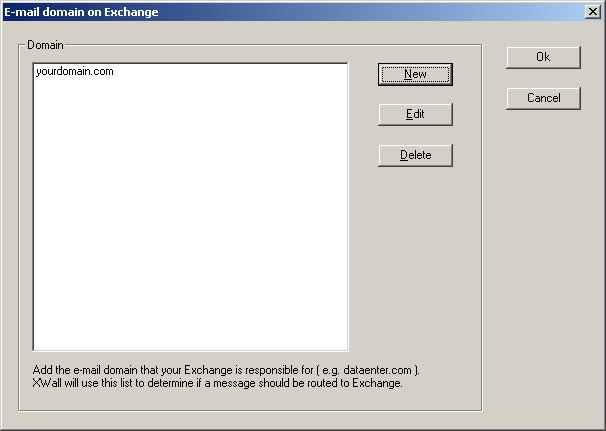
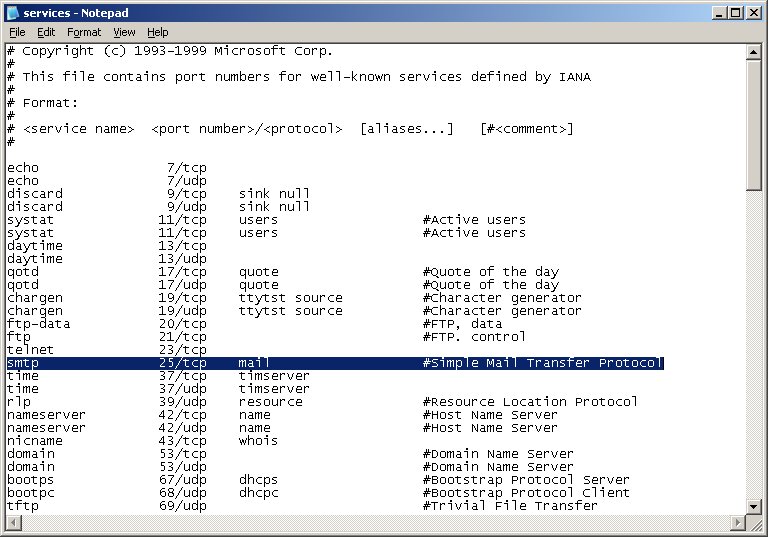
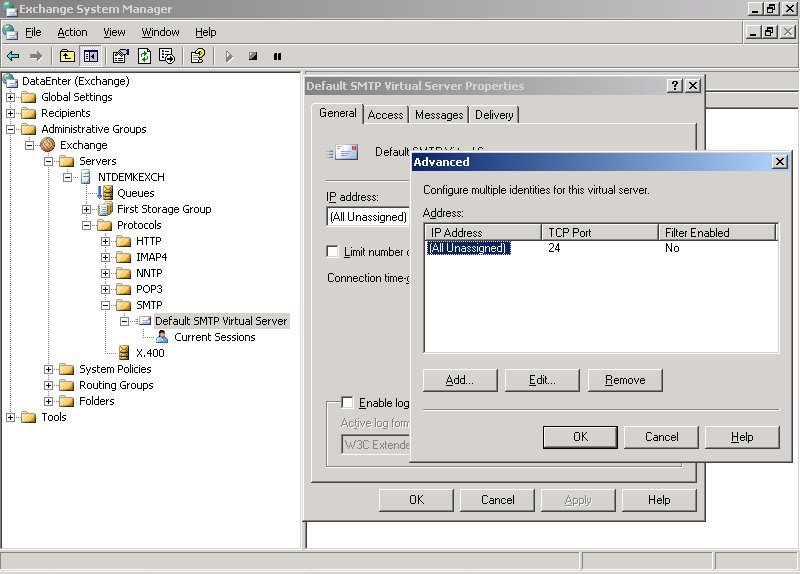
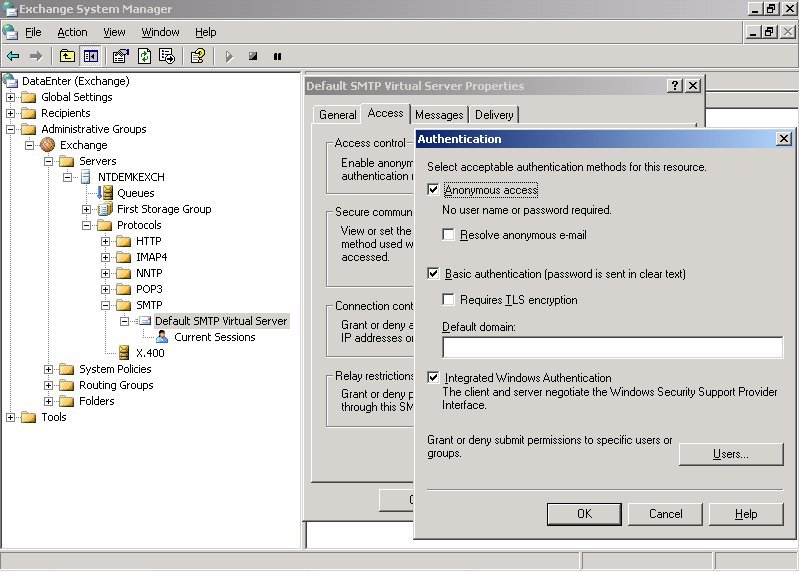
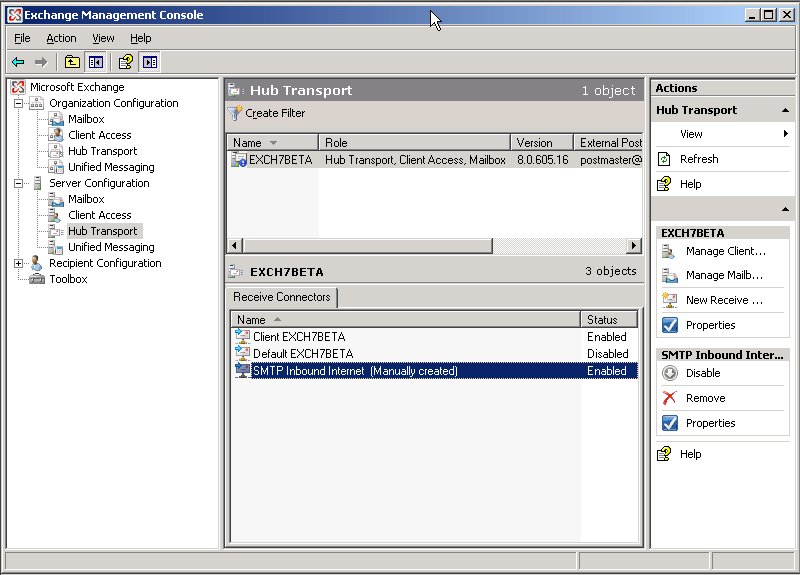
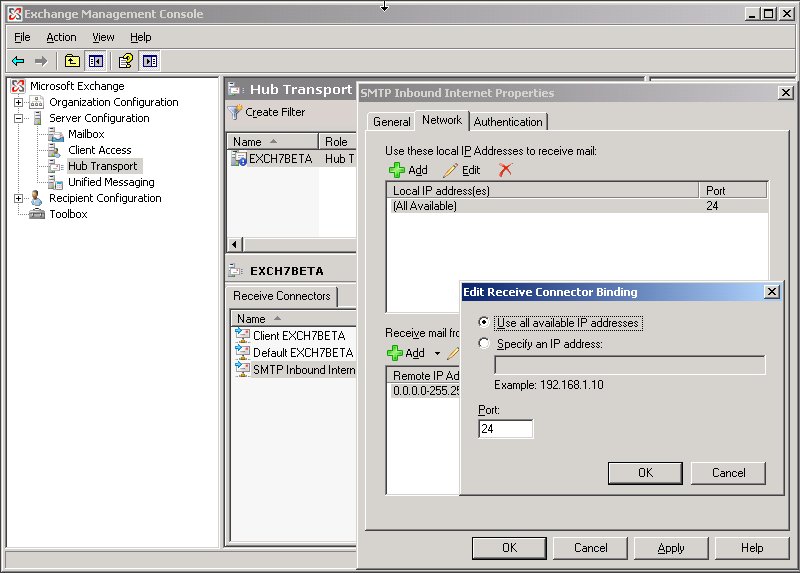
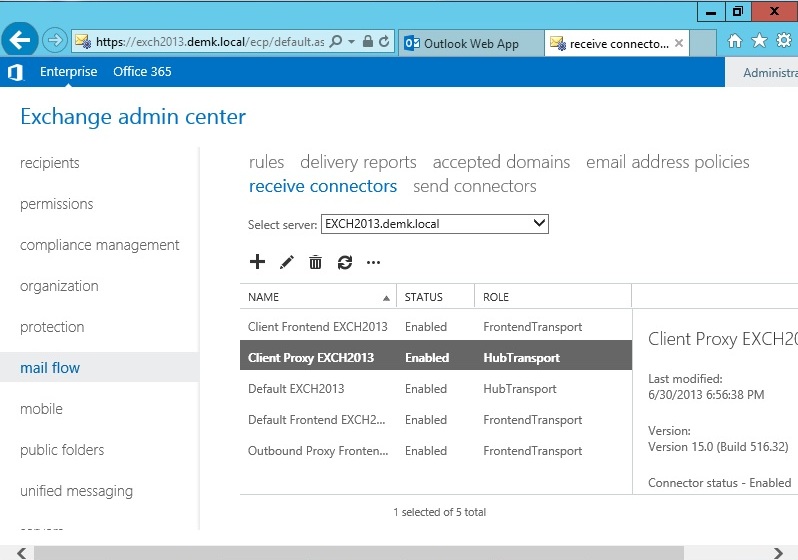
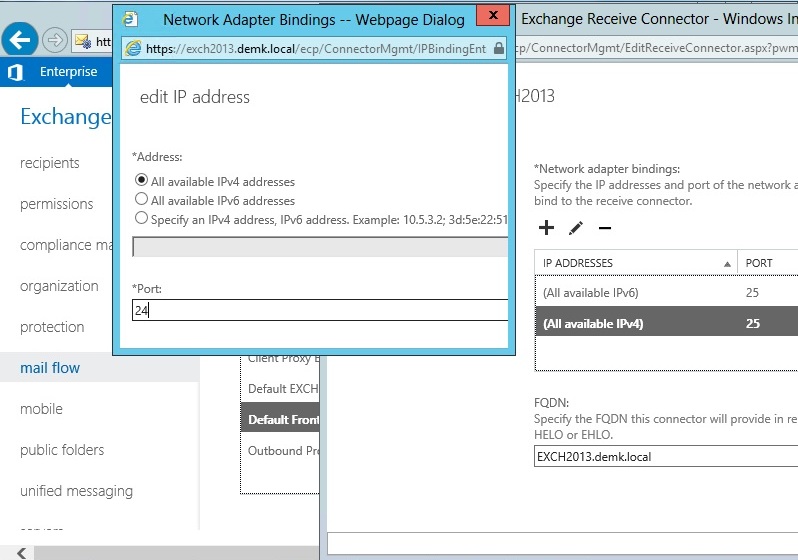
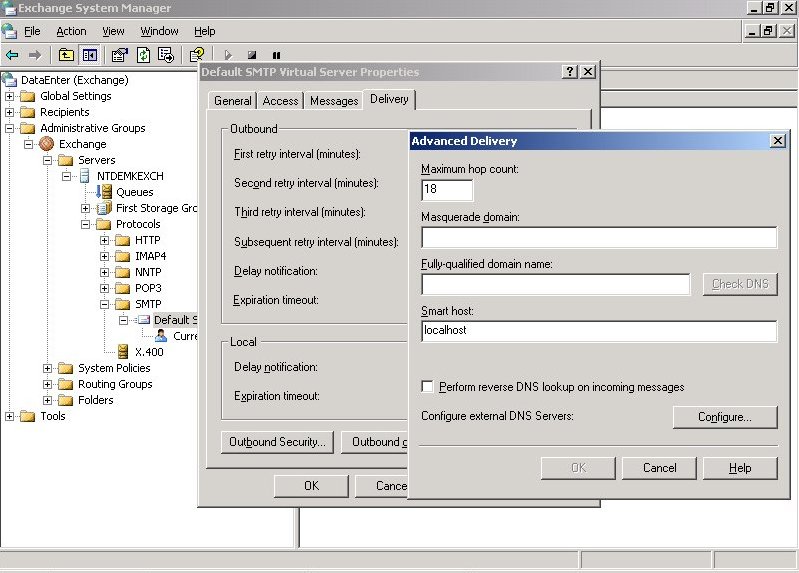
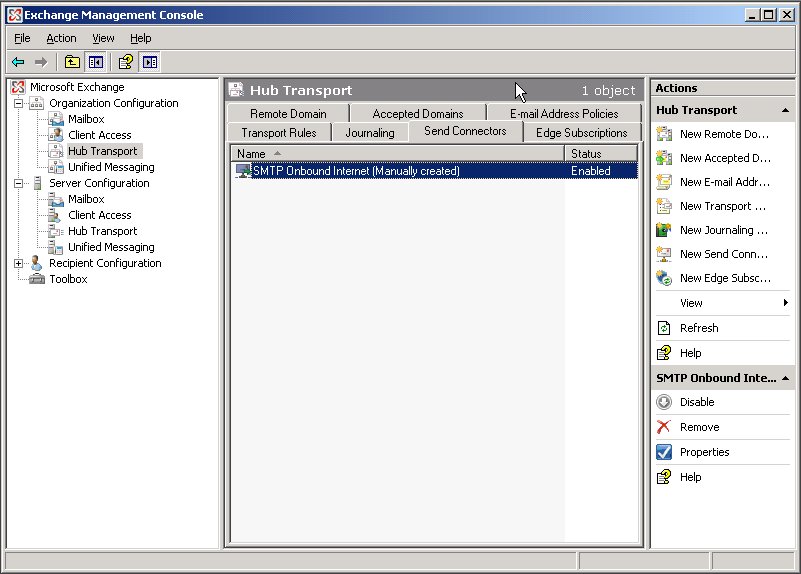
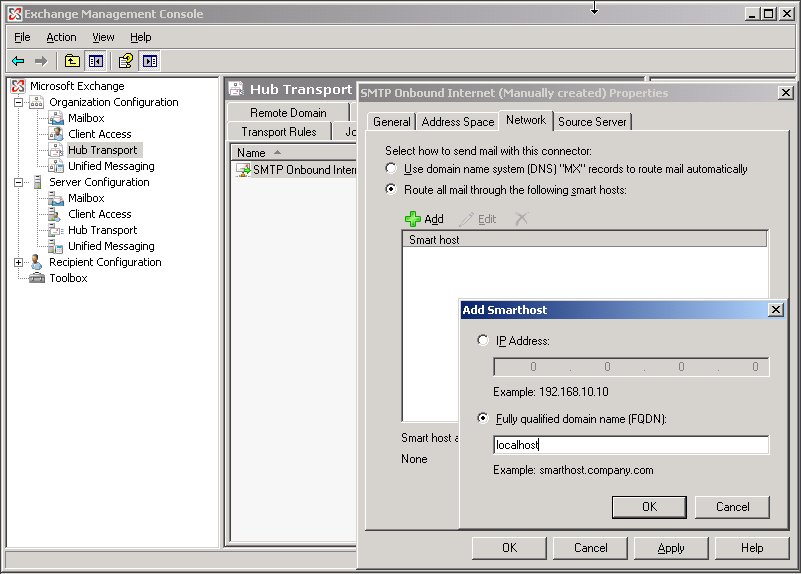
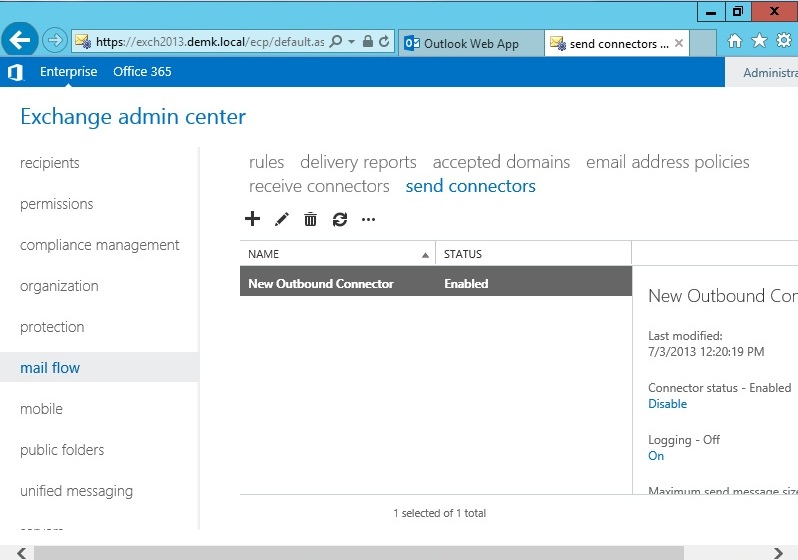
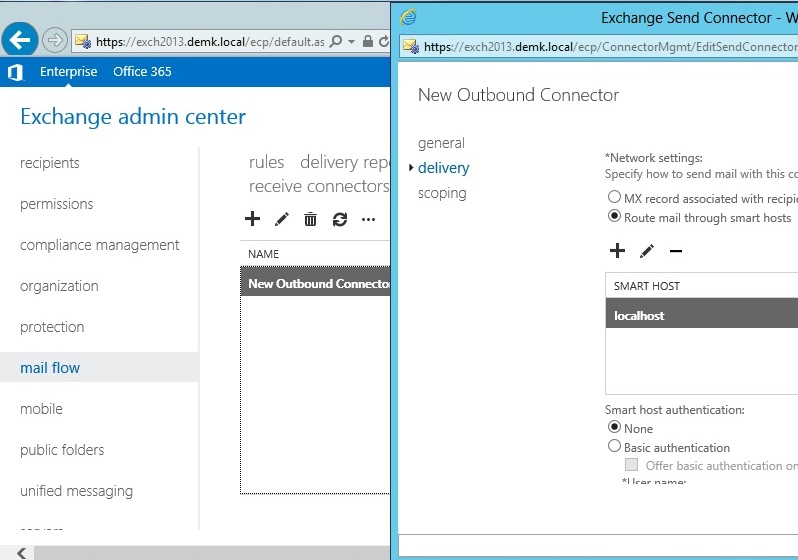
| Decide if XWall should be installed on the Exchange server or on a different machine: Single Exchange server If you have only one Exchange server and you have less than 10.000 messages each day, then run XWall on the Exchange server. More than one Exchange server in the organization If you have more than one Exchange server in your organization then you should run XWall on a different machine or at least at a different ip address, because the Exchange servers communicate internal states using Microsoft propriety SMTP verbs on port 25 and third party gateways like XWALL should not be inserted between internal Exchange servers traffic flow. Cluster If you have a cluster then you must run XWall on a different machine, because XWall doesn't support a cluster. Once you decided on which machine you are installing XWall, perform the following steps: Run Setup.exe or create a directory on your machine and copy all the files into this directory Start XWall Admin (MBAdmin.exe) to configure XWall The first time you run XWall you will be prompted for the following information: Postmaster's address The address of the person who is responsible for maintaining XWall. XWall will send all error messages to this address. The name or IP address of the Exchange server If XWall is running on the same machine as the Exchange server than you can (and should) use localhost as the name. The port Exchange listens If XWall is running on the same machine as the Exchange server than use port 24, else use port 25. Screenshot: XWall on the same machine as Exchange , XWall on a different machine The e-mail domain that your Exchange is responsible XWall needs to know for which e-mail domain your Exchange is responsible, so that if can forward messages for this domain to your Exchange. Screenshot: e-mail domain that your Exchange is responsible Running XWall on the same machine as Exchange server Incoming Messages If you run XWall on the same machine as the Exchange, then you must tell Exchange to listen on a separate port; i.e. not port 25, because only one application can listen to a specific port at one time and XWall needs to be the first application that gets SMTP messages. Exchange 5.x To do this open the file services, usually located in C:\WINNT\system32\drivers\etc\SERVICES with Notepad or any other text editor. Locate the line smtp 25/tcp mail and change 25 to the port of your choice (use 24 if you are not sure which one you should use) and save the file. Restart the IMS (Internet Mail Service) of the Exchange server to bring the new settings into affect. Screenshot: Notepad with SERVICES Exchange 2000/2003 Start System Manager (Exchange Admin) and select Servers->Your Server->Protocol->SMTP->Default SMTP Virtual Server->Properties. In this dialog select the tab labeled General and then Advanced and here you can set the port on which this virtual server listens. Screenshot: Exchange port Also make sure Anonymous access is allowed or else XWall is not able to connect to Exchange. In System Manager (Exchange Admin) select Servers->Your Server->Protocol->SMTP->Default SMTP Virtual Server->Properties. In this dialog select the tab labeled Access and then Authentication and enable Anonymous access. Screenshot: Exchange access Restart the SMTP service of Exchange to bring the new setting into effect. Exchange 2007/2010 and SBS 2008/2011 Start Exchange Management Console and select Server Configuration->Hub Transport->Receive Connectors Exchange 2007/2010 has two receive connectors, Client SRV and Default SRV. SBS 2008 has three receive connectors, Client SRV and Default SRV and Windows SBS Fax SharePoint Receive SRV. SBS 2011 has two receive connectors, Default SRV and Windows SBS Fax SharePoint Receive SRV. Default SRV and Windows SBS Fax SharePoint Receive SRV are the connectors that are bound to port 25 and you either need to change them to port 24 or disable them and create a new connector. In the first case select the properties of the Default SRV connector and in this dialog select the tab labeled Network and set the port to 24. In the second case create a new receive connector, type Internet and bind it to port 24. Screenshot: Exchange 2007/2010 inbound connector list, Exchange 2007/2010 port On Exchange 2007-2019 you need to enable Anonymous user access on the Hub or XWall can't send to Exchange. Start Exchange Management Console and select Server Configuration->Hub Transport->Receive Connectors ->Default Connector->Permission Groups and enable Anonymous users. Or you tell XWall an user and password so that it can perform a SMTP authentication. Start MBAdmin, select Options->General->Exchange->Exchange needs authentication and type in the user and password. Note: The user that you use for authentication MUST NOT have a mailbox and MUST be an administrator. DO NOT use Administrator, because there is a mailbox associated with that account and therefore it can't be uses for SMTP authentication. Note: On Windows 2008-2019 and SBS 2008 you need to open port 25 on the firewall. The firewall has only exceptions for Exchange, but not for XWall. So unless you open port 25, no mail will come in. Exchange 2013-2019 Start Exchange Admin Center and select Mail Flow->Receive Connectors Exchange 2013-2019 has five receive connectors, Client Frontend and Client Proxy and Default and Default Frontend and Outbound Proxy Frontend Default Frontend is the connectors that are bound to port 25 and you either need to change them to port 24 or disable them and create a new connector. In the first case select the properties of the Default Frontend connector and in this dialog select the tab labeled Network Adapter Bindings and set the port to 24. In the second case create a new receive connector, type Internet and bind it to port 24. Screenshot: Exchange 2013-2019 inbound connector list, Exchange 2013-2019 port Start Exchange Admin Center and select Mail Flow->Receive Connectors->Default Connector->Security and enable Anonymous users. Or you tell XWall an user and password so that it can perform a SMTP authentication. Start MBAdmin, select Options->General->Exchange->Exchange needs authentication and type in the user and password. Note: The user that you use for authentication MUST NOT have a mailbox and MUST be an administrator. DO NOT use Administrator, because there is a mailbox associated with that account and therefore it can't be uses for SMTP authentication. Note: On Windows 2008-2019 you need to open port 25 on the firewall. The firewall has only exceptions for Exchange, but not for XWall. So unless you open port 25, no mail will come in. Then start MBAdmin, select Options->General->Exchange->Exchange listens on port and type in the same port that you used in Exchange ( e.g. 24). Outgoing Messages Exchange 5.x Start Exchange Administrator, select the IMS (Internet Mail Service) and click on the tab labeled Connections. Enable Forward all messages to host and type in localhost. Close the dialog and restart the IMS. From then on the Exchange server will forward all messages to the localhost, which basically means it sends them to XWall. Exchange 2000/2003 If you have no SMTP connector then start System Manager (Exchange Admin) and select Servers->Your Server->Protocol->SMTP->Default SMTP Virtual Server->Properties. In this dialog select the tab labeled Delivery and then Advanced and in Smart host type in localhost. Screenshot: Exchange forward Close the dialog and restart the SMTP service of Exchange. From then on the Exchange server will forward all messages to the localhost, which basically means it sends them to XWall. If you have a SMTP connector then start System Manager (Exchange Admin) and select Routing Groups->Exchange->Connectors->Your SMTP Connector->Properties->Forward all mail through this connector to the following smart host and type in the name or IP address of the machine where XWall is running. Close the dialog and restart Exchange. From then on the Exchange server will forward all messages to the name or IP address, which basically means it sends them to XWall. Exchange 2007/2010 and SBS 2008/2011 Start Exchange Management Console and select Organization Configuration->Hub Transport->Send Connectors If there is no connector in the list, then create one, else select the properties of the correct outbound connector. In this dialog select the labeled Network and then select Route all mail though the following smart host. Press the Add button and add localhost as the smart host. Screenshot: Exchange 2007/2010 outbound connector list, Exchange 2007/2010 smart host Close the dialog and restart Exchange. From then on the Exchange server will forward all messages to the name or IP address, which basically means it sends them to XWall. Exchange 2013-2019 Start Exchange Admin Center and select Mail Flow->Send Connectors If there is no connector in the list, then create one, else select the properties of the correct outbound connector. In this dialog select the labeled Delivery and then select Route mail through smart hosts. Press the Add button and add localhost as the list. Screenshot:Exchange 2013-2019 outbound connector list, Exchange 2013-2019 smart host Close the dialog and restart Exchange. From then on the Exchange server will forward all messages to the name or IP address, which basically means it sends them to XWall. Running XWall on a different machine than the Exchange server Incoming Messages Exchange (all versions) Start MBAdmin, select Options->General->Exchange->Name or IP address of the Exchange server and type in the name or IP address of the Exchange server. Screenshot: XWall on a different machine Depending on your DNS configuration you will need to change the MX record so that it points to the machine where XWall is running or else XWall will not get the messages before Exchange. Note: On Windows 2003-2022 you need to open port 25 on the firewall. So unless you open port 25, no mail will come in. Office 365 Start MBAdmin, select Options->General->Exchange->Name or IP address of the Exchange server and type in the name of your Office 365 MX record, which is something like yourdomain.com.mail.protection.outlook.com Screenshot: XWall on a different machine Make sure you disabled spam blocking on Office 365, or Office 365 will start blocking messages from XWall, which results in a stalled queue. Further make sure you created an inbound connector in Office 365 so that Office 365 accepts the messages that XWall sends. Depending on your DNS configuration you will need to change the MX record so that it points to the machine where XWall is running or else XWall will not get the messages before Office 365. Outgoing Messages Exchange 5.x Start Exchange Administrator, select the IMS (Internet Mail Service) and click on the tab labeled Connections. Enable Forward all messages to host and type in the name or IP address of the machine where XWall is running. Close the dialog and restart the IMS. From then on the Exchange server will forward all messages to XWall. Exchange 2000/2003 If you have no SMTP connector start System Manager (Exchange Admin) and select Servers->Your Server->Protocol->SMTP->Default SMTP Virtual Server->Properties. In this dialog select the tab labeled Delivery and then Advanced. In Smart host type in the name or IP address of the machine where XWall is running. Close the dialog and restart Exchange. From then on the Exchange server will forward all messages to XWall. If you have a SMTP connector then start System Manager (Exchange Admin) and select Connectors->Your SMTP Connector->Properties->Forward all mail through this connector to the following smart host and type in the name or IP address of the machine where XWall is running. Close the dialog and restart Exchange. From then on the Exchange server will forward all messages to the name or IP address, which basically means it sends them to XWall. Exchange 2007/2010 and SBS 2008/2011 Start Exchange Management Console and select Organization Configuration->Hub Transport->Send Connectors If there is no connector in the list, then create one, else select the properties of the correct outbound connector. In this dialog select the labeled Network and then select Route all mail though the following smart host. Press the Add button and add type in the name or IP address of the machine where XWall is running as the smart host. Screenshot: Exchange 2007/2010 outbound connector list, Exchange 2007/2010 smart host Close the dialog and restart Exchange. From then on the Exchange server will forward all messages to the name or IP address, which basically means it sends them to XWall. Exchange 2013-2019 Start Exchange Admin Center and select Mail Flow->Send Connectors If there is no connector in the list, then create one, else select the properties of the correct outbound connector. In this dialog select the labeled Delivery and then select Route mail through smart hosts. Press the Add button and type in the name or IP address of the machine where XWall is running as the smart host. Screenshot:Exchange 2013-2019 outbound connector list, Exchange 2013-2019 smart host Close the dialog and restart Exchange. From then on the Exchange server will forward all messages to the name or IP address, which basically means it sends them to XWall. Office 365 First you need to tell XWall to relay all messages from Office 365. Start MBAdmin, select Options->General->Relay->Allow Relay from host add *.outbound.protection.outlook.com Then you need to create an outbound OnPremises connector in Office 365 so that all outgoing messages are sent to your XWall. At present you can't use the GUI to create such a connector that really works, because the RouteAllMessagesViaOnPremises flag is not available. But you can use Powershell to create the connector: new-OutboundConnector -name O365-To-OnPrem Once you have done this you can start MBServer and check if all messages are properly routed. |
| Run XWall as a service |
| Once you run XWall as a service, errors will only be visible in the logfile or in the main window of MBAdmin. Consequently, before running it as a service you must first ensure that XWall is running properly with no errors by launching it in Console Mode (i.e. starting it from an icon). In general, installing XWall as a service should be your last task and not your first. Note: Keep in mind that XWall needs to reside on a local disk or the service controller will not be able to start it. Also make sure MBAdmin.exe and MBServer.exe are in the same directory. Install the service using the GUI Start MBAdmin, select View->Service and here you can install, remove, start and stop the service. By default it is an AutoStart service and any time your computer is started, XWall will start. Note:After you have started XWall as a service, verify that XWall has no errors. You need to take a look into the logfile to do this or start MBAdmin and in the main window you see the logfile. Install the service from the command line Open a DOS box and change to the directory where XWall is installed (usually C:\POPBeam or C:\Program Files\XWall) Installing XWall as a service Start MBServer.exe with the argument of install, by typing MBServer install at the command prompt and XWall will create the service. By default it is an AutoStart service and any time your computer is started, XWall will start. You can start and stop XWall at any time via Control Panel Note: After you have started XWall as a service, verify that XWall has no errors. You need to take a look into the logfile to do this or start MBAdmin and in the and in the main window you see the logfile. Removing XWall as a service Start MBServer.exe with the argument of remove, by typing MBServer remove at the command prompt and XWall will delete the service. |
| How to Stop XWall |
| XWall runs as a console application Press ESCAPE Select Close from the system menu Press Alt-F4 XWall runs as a service Open Control Panel, select Services, locate XWall and press the button labeled Stop Type net stop XWall at the command prompt |
| Upgrade to the latest Version |
| You will find the latest version of XWall in the Download Center setup_xwall_??.exe searches for a previously installed XWall and updates only the executable files. The settings, which are stored in xwall.ini and *.dat, are not touched. If the XWall service is running, it is stopped and restarted after the update. In the unlikely event that a executable is locked, the setup program asks for a reboot to change the file. If you refuse the reboot, you need to manually reboot later to bring the new executable into affect. Note: If you are upgrading from a very old version then you must reapply your registration number. |
| Tighten Security |
| To tighten your e-mail security as much as possible enable the following setting: |
| Fight Spam |
| There are two ways to fight against spam and both have advantages and disadvantages: Block all messages as early as possible The advantage is that the messages do not reach your server and are blocked as early as possible, most of them at the SMTP protocol level. The drawback is that the administrator needs to handle all the exceptions. For example, if you enable the Spam Lookup Service (SLS) and you tell XWall to block all messages that are on the spamcop.net list, then this will catch a lot of spam mails (usually around 50%). However, your best customer/supplier/friend/relative will also be blocked because he/she is using a mail server which is on the list. So you need to exclude this mail server and you need to adjust it any time the IP address changes. What makes the task really time consuming is the fact that the customer/supplier/friend/relative does not simply tell you that your server does not accept mail because it is on a spam list. They will call you and say something like "I can not send to you" and you have to figure out what the problem might be. Let all messages come in and mark the subject The advantage of this is that the administrator has absolute no work and it give the most flexibility, because XWall only marks the subject (it adds a small text like [sls] at the end of the subject). The final recipient can then simply setup a rule in his/her e-mail client that deletes all messages where the subject contains [sls]. He/she can maintain a local exception list and do not need to call the administrator for handling an exception. Another option would be to color code the message rather then deleting it. In practice this this has been proven to be the best way to fight spam. Note: On Exchange 2003/2007/2010 then you can use Mark subject and move to Junk-E-Mail folder. However, XWALLFilter , which is an add-on even sink, needs to be installed on your Exchange. For more info on XWALLFilter at click here. |
| Operations Guide |
| Enable Automatic White List - Options->Global Exclude->Exclude - White List This allows you to use a more aggressive spam catching strategy, because everyone to whom you send a e-mail is automatically excluded from spam checking. Enable Greylisting - Options->Spam->Greylisting At present by far the best way to block spam, some 80% with nearly no false positive. Note: make sure the spammer do not bypass Greylisting by sending over your backup MX. Use XWall or a server that can handle Greylisting on your backup MX. Enable Spam Lookup Service - Options->Spam->SLS/RBL One of the best methods, it catches around 50% of spam Enable the Central Checksum Service (CCS) - Options->Spam->CCS The Central Checksum Service (CCS) is designed to detect bulk e-mail on a worldwide level. For a live statistic of the CCS server click here Verify the senders domain and do not accept invalid domains - Options->Session->Verify Verifies that the sender uses a valid e-mail domain. There is no need to accept from e-mail addresses that you can't send to. Verify if the recipient - Options->Session->Recipient Accept only messages for e-mail addresses that really exist on your Exchange. Often spammer use a list of names and combine the name with your domain and then send a message to every address, hoping that at least a few e-mail addresses are valid. Due that Exchange send back a non-delivery report for every non-existing e-mail address you end up with thousands of undeliverable message in the outbound queue and so it's better to reject such messages during the SMTP session. Also XWall needs a lot of CPU power to process all these messages and you may end up with messages delays and a lot of messages in MSG-IN directory. Enable a heuristic approach to filter out spam mails - Options->Spam->Heuristic The classification algorithm is based on rules that use a wide range of heuristic tests on mail headers and body text to identify spam messages. Enable Image Spam blocking - Options->Spam->Image Image spam is getting very popular, because it bypasses word based filters. Enabling this method will block all image based spam. Check if the message uses BCC (Blind Carbon Copy) addressing - Options->Spam->Envelope Most spam messages are sent as BCC and so this is a very effective way to fight against spam. Combined with a Spam Lookup Service it should catch around 95%. However, the drawback is that an extensive exclusion list is needs, because not every BCC is a spam. Because of this there is no way to block BCC message in XWall. Enable a statistical approach with the Bayesian filter to filter out spam mails - Options->Spam->Bayes Works far better than the simple word blocking, because it is fully dynamic and there is no need to maintain a word list. Block messages where the SPF results in a FAIL - Options->Spam->SPF SPF checks if the message is coming from the permitted mail server of the sender. This prevents from spammer that use a valid e-mail domain as the From: address but relay through a completely different mail server. Scan the subject for strings - Options->Blocking->Subject Scan the text for strings - Options->Blocking->Text Scan the HTML for strings - Options->Blocking->HTML Use the Add Common button to block messages with word and strings that spammer commonly use Enable Header blocking - Options->Blocking->Header Use the Add Common button to block messages send by mail software that that spammer commonly use |
| Helper Programs |
| Signal is a command line program that allows you to perform the same commands as from the Signal menu of MBAdmin. You can force sending of outbound messages by simply clicking on a link rather than starting MBAdmin. LogView allows you to view the logfile in real time from any machine on your network. This is especially useful if MBServer runs as a service. TestMX is a command line program to resolve the MX record for a give domain and then connect to the mail server. The main purpose is to troubleshoot MX related problems or to check if a domain can accept messages. ExchImp is a command line program to import Exchange E-mail addresses into datauser.dat for verification of the recipients e-mail address. LDAPImp is VBScript to import AD E-mail addresses into datauser.dat for verification of the recipients e-mail address. CSVToEnv is a command line program to recreate the envelope from the statistic file. CSVToEnv is needed to resend messages from the history folder. TLS/SSL Toolkit contains a generic certificate that you may use for a quick start. Download TLS/SSL Toolkit and extract tlscert.pem and cacert.pem into the XWall directory and then turn on TLS/SSL. Approve-Toolkit contains ApproveAction.vbs UDM.vbs and some sample data that you may use as a starting point for your own script that is used in the user defined method or approves the spam method and/or action that XWall triggers. SerializeLog by Softec Integrations AG is a command line program to serialize the XWall logfile to facilitate troubleshooting. UniqueLog extracts the part from a logfile that belong to an unique id XWALLFilter is an add-on even sink to XWall, which automatically routes any XWall marked message into the Junk-E-Mail folder of Exchange 2003/2007/2010. |
| Licensing Agreement |
| XWall ® is copyrighted 1993-2015 by DataEnter GmbH This product and its documentation may not, in whole or in part, be copied, rent, leased, loaned, resold, assigned, sublicensed, modified, reproduced, transmitted, transcribed, stored in a retrieval system, or translated into any other natural or computer language, in any form or by any means whatsoever, be it electronic, mechanical, magnetic, optical, manual or otherwise, without the prior written consent of DataEnter. DataEnter makes no warranty or representation, either expressed or implied, with respect to the product XWall and its documentation, their quality, performance, merchantability, or fitness for a particular purpose. DataEnter reserves the right to revise the user's guide and make changes to the content without obligation to notify any person or organization of such change. In no event will DataEnter be liable for any direct, indirect, special, incidental or consequential damages, real or imagined, resulting from the use or purchase of this software. Under no circumstances shall DataEnter's liability for damages exceed the price paid for the software license. Should any remedy hereunder be determined to have failed, all limitations of liability and exclusion of damages set forth above shall remain in full force and effect. The extent of the DataEnter's warranty for the software and its documentation is limited to physical defects of the distribution media containing the software. Contact DataEnter to obtain return authorization for the replacement diskette within 30 days of the original date of purchase. Any further statement made by agents, employees, distributors or dealers of DataEnter do not constitute warranties and are not binding. No employee of DataEnter has the authority to modify any portion of this warranty. All brand and product names we refer to in the documentation are used solely for identification purposes and may be trademarks of other companies. XWall Standard Edition: DataEnter, (the licensor) grants the buyer (the licensee) the right to use this copy of XWall Standard Edition (the program) on a single computer at a single location running a single instance and servicing a single Exchange server as long as the licensee complies with the terms of this license. XWall ISP Edition: DataEnter, (the licensor) grants the buyer (the licensee) the right to use this copy of XWall ISP Edition (the program) on a single computer at a single location running a single instance as long as the licensee complies with the terms of this license. The licensor reserves the right to terminate this license if the licensee violates any part of the agreement. The licensee agrees to make copies of the program only for backup purposes. The licensee agrees not to copy the documentation and to take all necessary precautions to ensure that the backup copies of the software are not distributed to or acquired by other parties. Support: Basic support by e-mail is free of charge Upgrades, Updates: Updates are free, as long as the major version number does not change. (at present the major version number is v3.x) Add-On: Add-on are additional or optional parts of XWall that enhance the capability of the core XWall program. The add-on have their own licensing schema, especially when they are provided by a third-party company. Central Checksum Service (CCS): CCS is an additional optional part of XWall and is licensed on a yearly subscription. CCS uses a lot of hardware and maintenances for the central CCS servers and to cover the cost, the CCS requires a yearly subscription. |
| History |
| v3.61 2025-04-17
|